
The instrument contains two types of lamps: the D2 (Deuterium) lamp and the WI (Halogen) lamp.
Parts Number: 206-20729 D2(Deuterium) lamp (L9263) For the DUV type
* When measuring wavelength above 200 nm for a long time on the SolidSpec-3700i DUV, it is recommended to purchase a D2 lamp (L6380-02) separately and use the high-priced L9263 only for measurements for wavelength below 200 nm.
« Replacing the Light Source Lamp »
WARNING:
• After measurement, the light source lamps and chamber will be hot.
To avoid burns, do not handle the lamp with bare hands. Turn the power OFF and allow the lamp to cool for at least one hour before replacing the light source lamp.
• To avoid the chance of fire, electrical shock, or instrument failure, turn the power OFF and unplug the instrument before replacing the light source lamp.
• Avoid looking directly at the illuminated light source lamp when the light source chamber cover is open. Doing so will expose the user to ultraviolet rays, which, if viewed directly, may cause visual impairment.
CAUTION:
• When handling a new lamp, wear gloves to avoid leaving fingerprints on the beam window. Stains will interfere with accurate measurement.
• Turn OFF the power to the instrument before removing the light source chamber cover.
• When removing and installing the light source cover, avoid bumping the tip on the top of the D2 (Deuterium) lamp against the back of the cover. Doing so may cause a vacuum leak in the lamp.
• When removing and installing the light source cover, avoid bumping the tip on the top of the D2 (Deuterium) lamp against the back of the cover. Doing so may cause a vacuum leak in the lamp.
1. Removing the Light Source Chamber Cover
1) 3700/3700i
With both hands, hold the handles on top of the light source chamber cover and detach the cover by pulling it straight up. The D2 lamp and WI lamp inside the light source chamber will be visible.
1) The DUV Type
After detaching the two retaining plates on the sides of the light source chamber cover, hold it firmly with both hands and lift it out.
2. WI Lamp Replacement
CAUTION: A hand may inadvertently touch the D2 lamp when replacing the WI lamp.
Cover the D2 lamp with a clean sheet of paper or cloth. Stains will interfere with accurate measurement. In addition, grasping the lamp too strongly may break it and cause injury. Handle with care.
Cover the D2 lamp with a clean sheet of paper or cloth. Stains will interfere with accurate measurement. In addition, grasping the lamp too strongly may break it and cause injury. Handle with care.
1) Remove the spring holder of the WI lamp from the lamp's head.
2) Pull the WI lamp out of the socket.
3) Wear gloves. Hold the new WI lamp at the top and bottom so as not to taint its beam window.
4) Insert the new lamp and push it forward until the two pins of the WI lamp touch the back of the socket hole and stop.
3) Wear gloves. Hold the new WI lamp at the top and bottom so as not to taint its beam window.
4) Insert the new lamp and push it forward until the two pins of the WI lamp touch the back of the socket hole and stop.
NOTE: The two pins of the WI lamp do not have polarity. It does not matter which pin is up.
5) Insert the tip on the top of the WI lamp into the hole of the spring holder to prevent the lamp from coming loose.
6) Close the light source cover and turn the instrument ON. Start the LabSolutions UV-Vis software and perform initialization under the [Standard Initialization Mode].
6) Close the light source cover and turn the instrument ON. Start the LabSolutions UV-Vis software and perform initialization under the [Standard Initialization Mode].
7) Complete the initialization and reset the cumulative lighting time of the WI lamp on the [Maintenance] window of LabSolutions UV-Vis.
NOTE: There are two initialization modes - [Standard Initialization Mode] and [Fast Initialization Mode]. Always perform initialization under the [Standard Initialization Mode] after replacing the light source lamp.
3. D2 Lamp Replacement
1) Slowly pull out the D2 lamp upwards and remove it from the socket.
2) Wear gloves. Insert the new D2 lamp into the socket and push it all the way to the back.
2) Wear gloves. Insert the new D2 lamp into the socket and push it all the way to the back.
3) Close the light source cover and turn the instrument ON. Start the LabSolutions UV-Vis software and perform normal initialization.
The [Configuration] window appears.
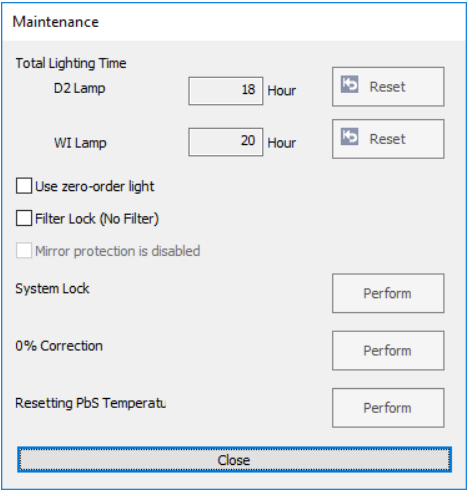
4) Complete the initialization and reset the cumulative lighting time of the D2 lamp on the [Maintenance] window of LabSolutions UV-Vis.
NOTE: There are two initialization modes - [Standard Initialization Mode] and [Fast Initialization Mode]. Always perform initialization under the [Standard Initialization Mode] after replacing the light source lamp.
4. Confirmation of Lighting Time of Lamp
4-1. When using UVProbe
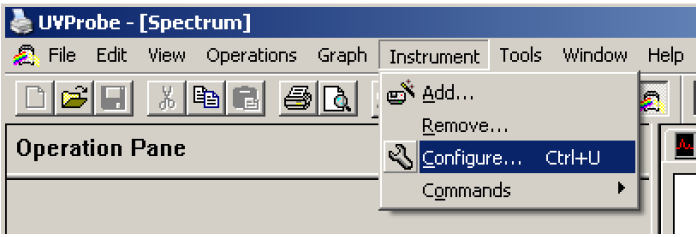
1) Click [Configuration] from the [Instrument] menu.
The [Configuration] window appears.
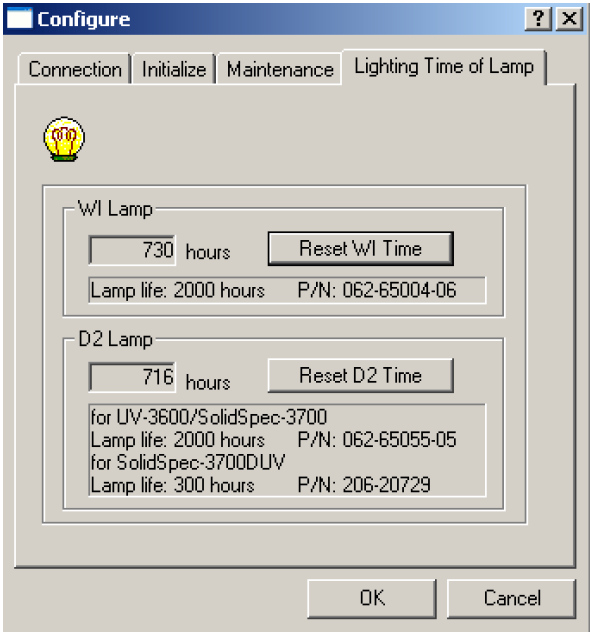
2) Click the [lighting Time of Lamp] tab.
3) Check the accumulated lighting time of lamp of the light souce.
4-2. When using LabSolutions UV-Vis
1) Turn ON the unit.
2) Start LabSolutions UV-Vis and check the lamp lighting time on [Maintenance] of the [Instrument] menu.
2) Start LabSolutions UV-Vis and check the lamp lighting time on [Maintenance] of the [Instrument] menu.
Comments
0 comments
Please sign in to leave a comment.