
1. Turning ON Power
1) Turn ON the power to the detector and the column oven.
2) Turn ON the power to the PPSQ.
3) Turn ON the power to the PC and the display.
4) Double-click the icon on the desktop.
1) Turn ON the power to the detector and the column oven.
2) Turn ON the power to the PPSQ.
3) Turn ON the power to the PC and the display.
4) Double-click the
The [LabSolutions Main] window opens.

5) Double-click the [PPSQ] icon in [LabSolutions Main] window.
The [PPSQ Analysis] window opens.
The [PPSQ Analysis] window opens.

PPSQ-x1

PPSQ-x3
Hereafter, it is possible to control the PPSQ and the LC analysis units from the PC.
2. Supplying N2 Gas
1) Open the cylinder's shut-off valve and the outlet-side needle valve(1) of the cylinder's regulator.

2) Check that the regulator's outlet-side pressure gauge reads 0.2MPa. If it does not, adjust the pressure as required.
3) In the [PPSQ Analysis] window, click [Purge Gas Tubing] on the [Maintenance] menu.
The [Purge Gas Tubing] dialog box is displayed.

3) In the [PPSQ Analysis] window, click [Purge Gas Tubing] on the [Maintenance] menu.
The [Purge Gas Tubing] dialog box is displayed.

4) Click [ON] to execute the purge operation.
5) When the air in the piping tube has been replaced with nitrogen, click [OFF] to stop the purge operation. (If the piping tube provided is used, this takes approximately 30 to 40 s.)
3. Perform HPLC control.
Make the settings for the PPSQ and the LC system in the [PPSQ Analysis] window.
1) In the [PPSQ Analysis] window, select [Sensor Status] on the [Monitor] menu.
The [Status] window is displayed.
Make the settings for the PPSQ and the LC system in the [PPSQ Analysis] window.
1) In the [PPSQ Analysis] window, select [Sensor Status] on the [Monitor] menu.
The [Status] window is displayed.

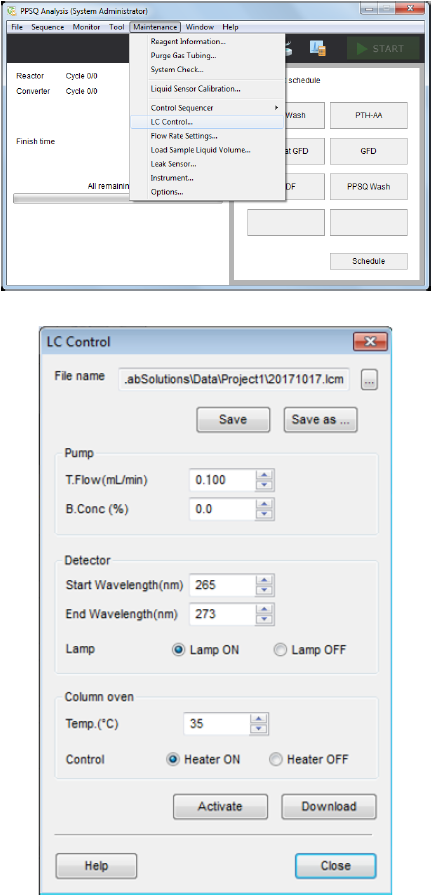
2) In the [PPSQ Analysis] window, select [LC Control] on the [Maintenance] menu.
The [LC Control] dialog box is displayed.
The [LC Control] dialog box is displayed.

3) Configure each function to the following value.
Pump: T.Flow: 0.1, B.Conc 0
Detector: Wavelength(Starting point) 265, Wavelength(Ending point): 273, Lamp ON
Column oven: Temp.40, Control Heater ON
HINT: In the [LC Control] dialog box, usually, the last method file used for the analysis is downloaded.
4) Click [Download] and [Activate].
PPSQ runs following the configured condition.
PPSQ runs following the configured condition.
5) After the temperature of Column oven reaches at 40ºC, enter [1] on [A.Flow] of Pump and click [Download].
6) Click [Close] at [LC Control] window.
7) Check the column pressure, the pump flow rate, and the column temperature with the monitor.
In the [PPSQ Analysis] window, select [Sensor Status] on the [Monitor] menu.
Display the HPLC monitor.
The column pressure is normally in the range 10 to 13MPa (35°C, flow rate:0.3mL/min, B.Conc: 0%).
3. Checking the Baseline
1) Click [Chromatogram] icon in the [PPSQ Analysis] window.
HINT: Alternatively, select [LC Analysis] on the [Monitor] menu in the [PPSQ Analysis] window.
1) Click [Chromatogram] icon in the [PPSQ Analysis] window.
HINT: Alternatively, select [LC Analysis] on the [Monitor] menu in the [PPSQ Analysis] window.

2) If the baseline deviates from "0" on the vertical axis, press the [ZERO] button on the detector.
3) Check that the baseline is stable. (Baseline fluctuation in a 10-minute period is 2.5 mAU or less.)
3) Check that the baseline is stable. (Baseline fluctuation in a 10-minute period is 2.5 mAU or less.)
4) Analyze the PTH-amino acids mixed standard, check the status of the HPLC analysis system, and correct (or create) the quantitative parameters ID table as required.
Comments
0 comments
Please sign in to leave a comment.